Therapies
Wet Cell Battery
The wet cell battery is a mild form of electrotherapy recommended in over 900 Cayce readings primarily for a wide variety of serious disorders. The principle is to introduce energy and medicinal vibrations directly into the body (bypassing the normal digestive and assimilative processes of the alimentary canal). Edgar Cayce stated that medicines taken vibratorially in this manner were safer with fewer side-effects than direct methods such as oral administration. Typically, this type of intervention is more “subtle” and requires longer periods of application to achieve therapeutic results. In other words, months or years of daily application of the wet cell battery are usually required.
General Instructions for the Wet Cell Battery
There are two primary chemical processes involved in the wet cell battery system. The first is the battery itself. The battery chemicals are mixed in a two gallon container. Copper and nickel rods are suspended into the battery mixture to produce a very small direct current.
The other primary chemical process takes place in the 4 ounce solution jar. The solution jar contains medicinal solutions. A hollow lead wire passes through the solutions and interacts chemically, eventually being dissolved by the solutions.
The chemical battery and solution jar are joined in an electrical circuit via wires. The wires are connected to nickel and copper disks which are attached to the body during treatment sessions.
Instructions for Mixing the Battery
Here are general instructions for mixing and using the wet cell battery:
- Unpack the wet cell container and wash it thoroughly; then dry with a clean cloth.
- Follow the assembly instructions which come with the battery. You will probably need to attach the copper and nickel rods to the lid of the battery.
- Be sure that the rods are sanded clean and bright.
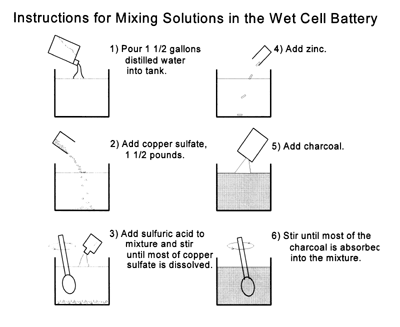
- Pour 1 1/2 gallons of DISTILLED WATER into the battery container. The container may have a mark to indicate this level.
- For the special battery described in reading 5169-1, add the chemicals IN THE FOLLOWING ORDER:
- Copper Sulfate…………………………….. 2 pounds,
- Sulphuric Acid (Chemically Pure)………..6 ounces (25% dilution),
- Zinc………………………………………………10.6 grams,
- Willow Charcoal …………………………… 1/2 pound.
- Stir this solution thoroughly with a wooden stick.
- Place the lid on the container, with the rods projecting down into the solution.
- Allow the battery to set for at least 24 hours before the first session.
- Avoid moving the battery during the 30 day cycle of application.
- After 30 days empty the container and wash clean, then dry.
- Clean all corrosion from the poles by use of sandpaper or wire brush.
- Then repeat the above steps for the next cycle.
Mixing the chemicals is a simple process. Be sure to follow the exact order of mixing the chemicals. It is a good idea to wear rubber gloves and safety glasses to prevent bodily injury from spilled chemicals.
It is also a good idea to use a large plastic chest such as a Rubbermaid storage container (18 gallons; 24 inches x 16 inches x 16.5 inches – “Rough Tote”). It can be purchased at K-Mart or other stores featuring Rubbermaid products. This type of container virtually eliminates serious spills that can occur when using the wet cell battery.
Just place the empty wet cell into the storage container before mixing the chemicals. Leave the battery in this container until it is time to dump the chemicals (usually after 30 days). The Rough Tote even has handle grips to make it easy to carry the battery safely to the disposal area. There is usually enough extra room in the container for accessories such as wires, solution jars, etc. A matching lid covers everything, keeping the Wet Cell and accessories out of sight when not in use.
Instructions for Using the Solution Jar
In this application, the wet cell is used with a “solution jar” incorporated into the circuit. The jar typically has a four ounce capacity and contains three ounces of a medicinal solution. The type of solution will vary depending upon your condition. The four primary solutions are:
- gold chloride,
- silver nitrate,
- spirits of camphor
- Atomidine (or some other form of iodine such as tincture of iodine).
Here are some basic instructions for using the solution jar:
- Twenty minutes prior to the session, screw the jar lid with the lead wire attachment onto the jar containing the solution.
- Sand or polish the copper and nickel plates.
- Hook up the wires as follows. The long red wire with the small copper plate is attached to the red terminal (copper pole) of the battery. The short black wire is attached to the black terminal of the battery (nickel pole) and onto one of the terminals of the solution jar. The long black wire with the large nickel plate is attached to the other terminal of the solution jar.
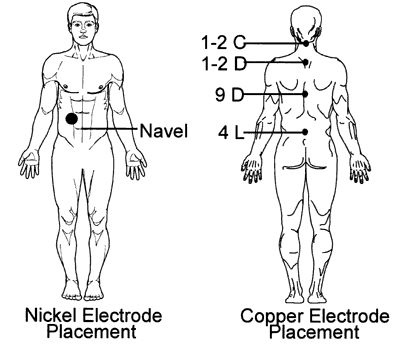
- To begin the session, attach the small copper plate (red wire) to the spinal center designated for that solution. You can use tape to hold the plates in place. Some wet cell kits include an elastic strap which goes around the body and holds the plates in position. Use the method that works best for you.
- Then, attach the large nickel plate to the abdomen about three fingers to the right and three above the navel. The large nickel plate is usually held in place with an elastic strap, but tape is sometimes used. Again, use what works best for you.
- Lie on your back during the session.
- Keep a constructive, positive attitude during the session. Use meditation, affirmations, visualization, or inspirational reading to facilitate the healing process.
- A typical session lasts 30 minutes. Longer and shorter sessions will be addressed under special applications in a later section.
- After the session, remove the plates and sand or polish them before storing them in separate containers (such as plastic sandwich bags). Do not allow the plates to touch each other, particularly during a session.
- Remove the solution jar lid and cap the solution with a plain lid. Store in a safe place until the next use.
- The lead wire that was in the solution must be cleaned before putting it away. It remains attached to the solution jar lid. Gently wipe off as much of the solution as possible. A fine wire brush (the kind plumbers use to clean copper tubing before soldering) can be used to remove the rest of the solution. Some solutions (particularly the gold chloride and silver nitrate) react chemically with the lead wire and eventually destroy the lead wire. This is to be expected. Just replace the lead wire as necessary. Remember that lead is a toxic element. You may want to use rubber gloves when cleaning the wire. Holding the wire under running water eliminates the problem of lead dust which can result from cleaning the wire loop under dry conditions. After cleaning, store the wire loop and jar lid until the next session.
- Occasionally, place the wires, plates and solution jar wire loop out in the sun for a couple of hours.
- When using more than one type of solution, alternate the solutions. That is, use one solution one day and another solution the next day, and so forth. Always have a separate solution jar and wire loop for each solution.
Additional Information
Doug Richards and David McMillin have written a book titled The Radial Appliance and Wet Cell Battery: Two Electrotherapeutic Devices Recommended by Edgar Cayce. The book provides additional information on how to make and use the Wet Cell Battery.
Instructions for Mixing Solutions in the Wet Cell Battery

Typical Locations for Wet Cell Electrodes

Note: As this information is not intended for self-diagnosis or self-treatment, your use of this database of information indicates that you are aware of our recommendation that you consult with a professional healthcare provider before taking any action.